Using Varjo Base
Varjo Base is the software used to control your headset. You can observe what the headset viewer is seeing, quickly access settings and presentation tools, and analyze your project with real-time data.
Overview of Varjo Base
The main window in Varjo Base is divided into different sections as shown in the image.

Using the Tools menu
See the table below for the different tools in the Tools menu.
XR-4, XR-3, VR-3, and Varjo Aero
| Real-world view | Turn on the mixed reality cameras to see the surrounding physical environment (XR-4 and XR-3). |
| Calibrate eye tracking | Start the eye tracking calibration. |
| Action tap / Action button |
Invoke a tap gesture of the touch area (XR-4) / Invoke a press of the Action button in the headset (XR-3). |
| Menu / Menu button |
Invoke a tap gesture of the touch area (XR-4) / Invoke a press of the Menu button in the headset (XR-3). |
| Headset view | Show or hide the window for Headset view. |
| Eye camera | Show or hide the Eye camera view. |
| SteamVR | Open the SteamVR status window. |
| Analytics window | Open the Analytics window. |
XR-1 Developer Edition, VR-2 Pro, VR-2, and VR-1
| Real-world view | Turn on the mixed reality cameras to see the surrounding physical environment (XR-1 Developer Edition). |
| Calibrate eye tracking | Start the eye tracking calibration. |
| Application button | Invoke a press of the Application button in the headset. |
| System button | Invoke a press of the System button in the headset. |
| Headset view | Show or hide the window for Headset view. |
| Eye camera | Show or hide the Eye camera view. |
| SteamVR | Open the SteamVR status window. |
| Analytics window | Open the Analytics window. |
Hosting a session
The viewer’s experience is displayed prominently in the headset view.
Below the headset view are tools to record your observations and guide the viewer when needed.
| Screenshot | Captures a screenshot of the Headset view. The image file is saved in the Pictures > Varjo folder on your Windows computer.
The Varjo logo and device name is added by default to screenshots. It is optional to use them, and you can adjust your preferences in the Presentation tab in the Settings panel. (XR-4, XR-3, VR-3, and Varjo Aero) |
| Record | Records video of the headset view. The video file is saved in the Videos > Varjo folder on your Windows computer.
The Varjo logo and device name is added by default to videos. It is optional to use them, and you can adjust your preferences in the Presentation tab in the Settings panel. (XR-4, XR-3, VR-3, and Varjo Aero) |
| Gaze dot | Visualizes the eye tracking feature to see where the viewer is looking. This feature is only accessible if eye tracking is calibrated. |
| Pointer | Turns your mouse cursor into a VR pointer that is visible inside the headset. |
| Mute and activate microphone | Turns your microphone on and off. (XR-4) |
Using presentation options
The Presentation tab in the Settings panel contains features to ensure optimized immersive experiences. In addition, there are options related to presentations. For all the options, see the table below.
| Background scene | Select a background scene that is shown when no applications are running. |
| How to wear your headset | Show instructions inside the headset on how to wear the headset and how to check image quality. |
| Disable touch controls | Disables the touch controls, so that the viewer can focus on the immersive experience while the presenter controls headset features from Varjo Base (XR-4). |
| Disable headset buttons | Disables the headset buttons, so that the viewer can focus on the immersive experience while the presenter controls headset features from Varjo Base. (XR-3, VR-3, Varjo Aero, VR-2 Pro, VR-2, XR-1 Developer Edition, and VR-1). |
| Disable mouse in headset | Disables the mouse in the headset, so that the mouse works on your computer only and cannot be used to control the Menu inside the headset. |
| Disable notifications in headset | Disables notifications in the headset to keep the immersive experience free of distractions.
Note that error messages are still displayed in the headset. |
| Watermark in recordings | Adds the Varjo logo and device name to the top-left corner of screenshots and video recordings. The watermark is enabled by default. (XR-4, XR-3, VR-3, and Varjo Aero). |
| Optimize performance | Improves performance by shutting down those Varjo processes that are not needed to run the current application. |
Positional tracking
XR-4 and XR-3
Tracking lets your VR application know the exact position of your headset and allows you to move around while using the headset.
Note that this section applies to Varjo inside-out tracking and SteamVR™ Tracking only. Contact your tracking technology provider for more information if you are using another tracking method.

Varjo inside-out tracking
Device statuses in Varjo Base
The tracking status of your headset and controllers is displayed in the status area in Varjo Base.
 |
Headset is connected and tracking. |
 |
Headset is connected but tracking is not working correctly. Make sure that tracking is calibrated and that you have good lighting in the room. |
 |
Headset is not connected. Power on your headset to connect. |
 |
Controller is connected and tracking. |
| Controller is connected but not tracking. Make sure that the controller is in view of the headset. | |
 |
Controller is not connected. Power on your controller to connect. |
Calibrating Varjo inside-out tracking
Varjo inside-out tracking uses the positional tracking cameras on the headset to continuously scan the room and keep track of your position while you are using the headset.
Tracking is calibrated when you set up Varjo inside-out tracking and a new calibration is started automatically whenever you use the headset in a new environment. The headset can remember where it was last used and no calibration is needed in the same environment.
You can manually start a new calibration at any time as follows:
XR-4
- Navigate to the System tab in Varjo Base.
- Under Tracking select Recalibrate floor level.
XR-3
- Navigate to the System tab in Varjo Base.
- Under Headset tracking, make sure that Varjo inside-out tracking (Beta) is selected.
- Start Varjo inside-out tracking (Beta) calibration.
Read more about preparing your environment.
Forward direction and origin
When using Varjo inside-out tracking, you can quickly adjust the forward direction, origin point, and floor level of your tracking environment. This is useful if, for example, you want an application to start in another direction.
You can adjust the tracking setup as follows:
- In Varjo Base, navigate to the System tab and select Forward direction and origin. Alternatively, open the Menu and select the shortcut for Forward direction and origin.
- Move to the location you want to set as the origin point of your tracking environment.
- Face the direction you want the content to appear from.
- If needed, press the up and down arrow keys on your keyboard to align the virtual grid with the floor level. Push Reset with your finger if you want to return the grid to its original level.
- When ready, push Confirm with your finger.
SteamVR™ Tracking
Device statuses in Varjo Base
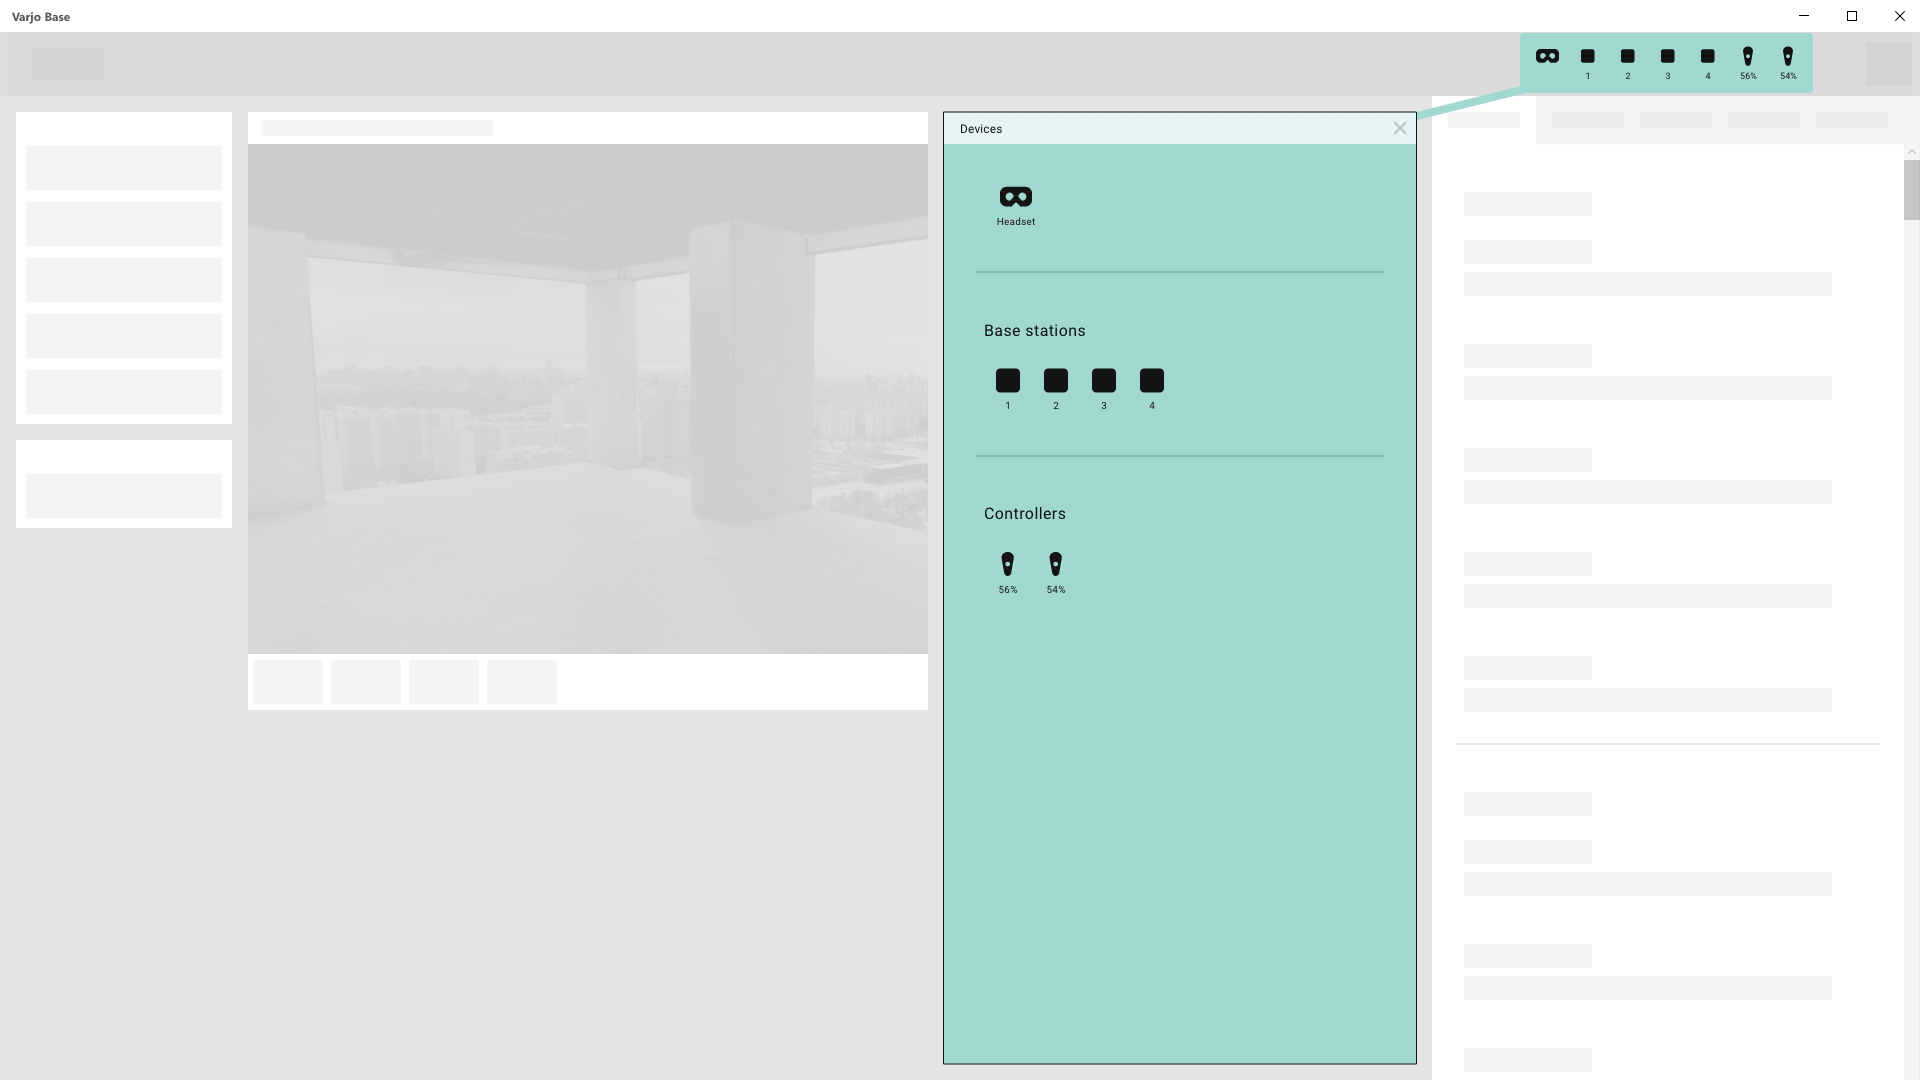
The tracking status of your headset is displayed in the status area in Varjo Base. With SteamVR™ Tracking, your base stations and optional controllers are listed as well.
 |
Device is connected and tracking. |
| Device is connected but tracking is not working. Tracking may be temporarily lost if the device is not in direct line of sight with the base stations. | |
 |
Device is not connected. Power on your devices to see their status. |
 |
Device battery is low. You will need to charge it soon. |
 |
Device is charging. |
If many devices are connected, they are grouped together by device type. Click the status area to see a detailed view of all devices.
Room setup
Room setup is performed when you set up SteamVR™ Tracking for your headset. You can start a new room setup at any time as follows:
- Navigate to the System tab in Varjo Base.
- Make sure that SteamVR™ is selected under Headset tracking.
- Start SteamVR room setup.
Perform this setup whenever you start to use the headset and base stations in a new environment, or if you move the base stations in your current environment.
Read more about preparing your environment.
Override origin and direction
When using SteamVR™ Tracking, you can override the origin point, direction, and floor level of your room setup in Varjo Base. This can help you temporarily fix tracking-related problems, such as your application starting in the wrong direction or virtual content drifting out of place.
The override feature applies to your headset by default. Other trackables, such as controllers, are affected if your application supports the feature.
Note that this feature is intended to be a temporary fix only. We recommend you carefully check your tracking environment and perform a new room setup in SteamVR to correct problems related to tracking.

Follow the instructions to adjust your room setup:
- Place your headset in the location where you want to start the scene and point it in the desired direction.
- In Varjo Base, navigate to the System tab and select Override origin and direction. The Override button text will change to Active.
- If needed, set the headset elevation in centimeters under Headset elevation from floor.
While the override setting is active, your application will use the adjusted room setup over the original one.
Return to your original room setup by clicking the Active button.
Analytics window
The Analytics window in Varjo Base includes tools that are useful for developers in particular.
To open the Analytics window, navigate to the Tools menu and select Analytics window. Click the icon in the bottom left corner to bring up the toolbar.

The following features are available in the Analytics window toolbar:
| Advanced view options | Enables or disables viewports that are visible in the headset view. The options are Left, Right, Peripheral, and Focus, which correspond to the view from the left and right eye, as well as the peripheral and focus areas. |
| Screenshot, Screen recording |
Captures a screenshot or records video of the headset view. Screenshots are saved in the Pictures > Varjo folder and videos in the Videos > Varjo folder on your computer.
The Varjo logo and device name is added by default to screenshots and videos. It is optional to use them, and you can adjust your preferences in the Presentation tab in the Settings panel. (XR-3, VR-3, and Varjo Aero) |
| Eye tracking | Opens further options related to eye tracking:
Note that these options are available only when you have calibrated eye tracking for your headset. |
| Performance | Displays live data about the performance of the current application.
|
| Depth | Toggles the depth buffer view for applications that use depth estimation. |
| Foveated rendering | Opens further options related to foveated rendering:
Note that this button is visible only when using or simulating XR-3, VR-3, or Varjp Aero. |
| Simulate, Video pass-through |
Shows further options for simulating different Varjo headset models. Select a headset model in the Simulated headset drop-down list.
Select XR-4, XR-3 or XR-1 Developer Edition to bring up additional settings:
Note that the Analytics window may restart when you select a headset model to simulate. |
| Action tap, Action button, Menu button |
Emulate the physical headset touch area / buttons on Varjo headsets:
Note that the names of the headset buttons depend on your headset model. |
| Mouse and WASD | Simulates headset movement. When enabled, you can rotate and move in the view as follows:
|
| Full screen | Toggles the full-screen mode for the Analytics window. |
Diagnostics
If you encounter a problem with your Varjo product or service that requires help from Varjo Support team, collecting diagnostics can help to solve the issue quickly. Using Varjo Base, you can collect information about your Varjo system and send it to Varjo Support for troubleshooting.
To start diagnostics collection, go to Support tab > Troubleshooting > Diagnostics.
With some Varjo headsets you can choose what diagnostics you want to gather:
- Eye camera (XR-4, XR-3, VR-3, and Aero):
- Recording of headset’s eye camera for troubleshooting eye tracking related issues.
- Varjo inside-out tracking (XR-4, XR-3):
- Recording of headset’s front cameras for troubleshooting inside-out tracking related issues.
- Varjo Controllers (XR-4):
- Recording of controllers for troubleshooting tracking and connection issues.
Additionally, diagnostics information includes for example the following:
- Varjo system log files, including system events and error messages.
- Computer hardware configuration, including, for example, motherboard, processor, graphics card, memory.
- Computer OS and installed software: Windows version, Varjo Base version, SteamVR version (if installed).
- Connected headset information: headset serial number, firmware version.
- Connected peripherals information: for example, third-party controllers, and trackers.
When sending diagnostics, we ask you to provide an email address (mandatory) and additional notes and attachments (optional) to Varjo for contacting you about your support request.
You can choose to send all or only part of the diagnostic files to Varjo. You can always review and edit all diagnostic files before sending them to Varjo. Varjo Base never sends diagnostics automatically.
Crash reports
- You can choose to help our product development and allow sending automatic crash reports to Varjo in case the system malfunctions. This feature can be controlled from Varjo Base.
- Crash reports include Varjo system log files, including system events and error messages. Crash reports do not contain your personal data.
- Varjo System does not report crashes without your permission.
Software and firmware updates
You can download software and firmware updates for your headset and Varjo Controllers either in Varjo Base or manually from Varjo Account Portal. We recommend that you always use the latest supported software and firmware for your headset.
Note that you will need a Varjo Account to download updates.

Automatic software and firmware updates
To enable automatic software and firmware updates, navigate to the Support tab and enable Automatically check for updates. This allows Varjo Base to automatically check and display a notification when updates are available. Varjo Base will always ask for your permission to install updates.
Manual software and firmware updates
To manually check for software and firmware updates, navigate to the Support tab and select either Varjo Base software update, Headset firmware update, or Controller firmware update (XR-4). If a newer version is available, select Download and follow the instructions to update.
For computers without internet access, you can download the files on another computer, copy the installation file over to your computer, and install.
Updating firmware
While a firmware update is running, open View details to follow its progress. The update process may take a while, during which your headset will restart several times. Do not disconnect the headset, quit Varjo Base, or turn off your computer while the update is in progress.
If the firmware update is not successfully completed, we recommend that you run it a second time. If you still encounter a problem, please contact Varjo Support.
Important: Only use Varjo Base to install firmware updates for your headset and controllers. Never attempt to update the firmware using the SteamVR application. If SteamVR suggests you update the firmware, please ignore the notification.
XR-4 Series Tweak Tool
XR-4
Varjo XR-4 Series Tweak Tool provides a set of options and information that will help you monitor headset performance and adjust some parameters for features that are still under development. Varjo Customer Support may also advise you to use the tool to help diagnose a possible issue with your headset.
Read more about how to use XR-4 Series Tweak Tool.