Getting the perfect image quality
This page will help you achieve the best possible image quality with the Bionic Display™ in your Varjo headset.
Concepts
Get to know some general concepts behind the industry-leading image quality in Varjo headsets.
Foveated rendering
XR-4, XR-3, VR-3, and Varjo Aero
Foveated rendering uses the eye tracking functionality built into your headset to improve the performance of applications and produce a better virtual experience.
With foveated rendering, the area with the highest image resolution follows your gaze so that you can always experience the best possible image quality. Simultaneously, your headset can render fewer pixels in peripheral areas, improving application performance. Read more about using foveated rendering.
Bionic Display™
XR-3, VR-3, XR-1 Developer Edition, VR-2 Pro, VR-2, and VR-1
The XR-3, VR-3, XR-1 Developer Edition, VR-2 Pro, VR-2, and VR-1 headsets feature professional-grade displays that combine incredible visual fidelity with edge-to-edge clarity. Additionally, our enterprise headsets feature the Bionic Display™ that lets you see virtual reality in human-eye resolution.
The highest and most intense resolution is in the center of the display, also called the “focus area.” This is similar to how the human eye works: you can see what is happening in the periphery of your field of view, but your focus is on what’s right in front of your eyes.
Look around to see your environment in the highest resolution.
Headset adjustments
Learn how to adjust your headset for the optimal viewing experience.
Adjusting the headset lenses
Varjo headsets can automatically adjust the position of the lenses based on your interpupillary distance (IPD). In Varjo Base, you can find the setting to automatically adjust the lenses under the Headset tab and Automatically adjust interpupillary distance.
Automatic adjustment of the lenses is enabled by default. Your headset will adjust the lenses when you put it on, and you may hear a short buzzing sound during the adjustment. We recommend that you keep the setting enabled for optimal comfort while using the headset.
Note that the automatic lens adjustment may fail if the headset is not positioned well and can’t detect your eyes. Read more about positioning your headset for optimal viewing.
To adjust the lenses manually, disable the setting for Automatically adjust interpupillary distance and set the distance to match your eyes.
Varjo headsets are designed for use with a wide range of interpupillary distances. Those with a smaller or larger interpupillary distance may not see content in the highest possible visual quality, or may feel discomfort when using the headset.
| Varjo headset model | Adjustment range | Supported IPD range |
| XR-4 | 56-72 mm | 54-74 mm |
| XR-3, VR-3, and Aero | 59–71 mm | 57–73 mm |
| XR-1 Developer Edition, VR-2 Pro, VR-2, and VR-1 | 61–73 mm | 59–75 mm |
Your headset will work with most single-vision eyeglasses, but the automatic adjustment may not work with special glasses or medical conditions that affect your vision. If the automatic adjustment does not work for you, you can disable the setting in Varjo Base.
Positioning the headset for optimal viewing
In order to see content in the highest visual quality the headset needs to be precisely positioned over your eyes. Optimal positioning is different for every individual as it depends on the shape of your head and eyes. Eyeglasses can also affect optimal positioning.
XR-4, XR-3, VR-3, and Aero
Adjust the headset when you put it on to find a comfortable fit. The headset is correctly adjusted when it sits comfortably on your head, stays in place, and the image inside the headset is sharp.

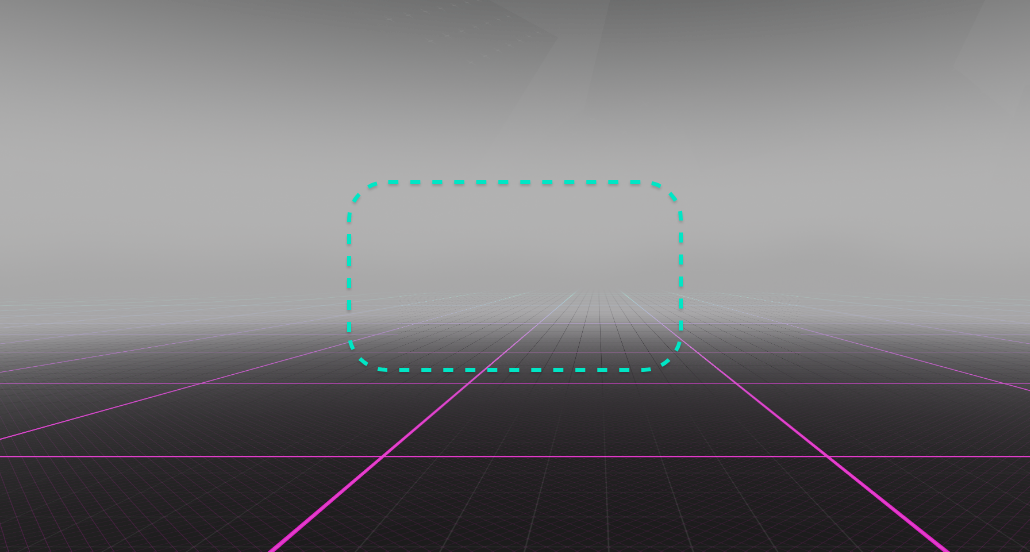
If the headset is not positioned well, straight lines in the virtual environment may appear curved as they travel from the edges towards the center of the display. You may also notice blue or red halo colors on the edges of light-colored objects.
XR-1 Developer Edition, VR-2 Pro, VR-2, and VR-1
The headset positioning guide in Varjo Base helps you to position the headset correctly over your head.
To quickly launch the guide, navigate to the Tools menu and open Headset positioning. Alternatively, navigate to the Headset tab and select Headset positioning guide. You also can set the headset positioning guide to appear automatically every time you put on the headset. Go to the Headset tab in Varjo Base and enable Automatic headset positioning.
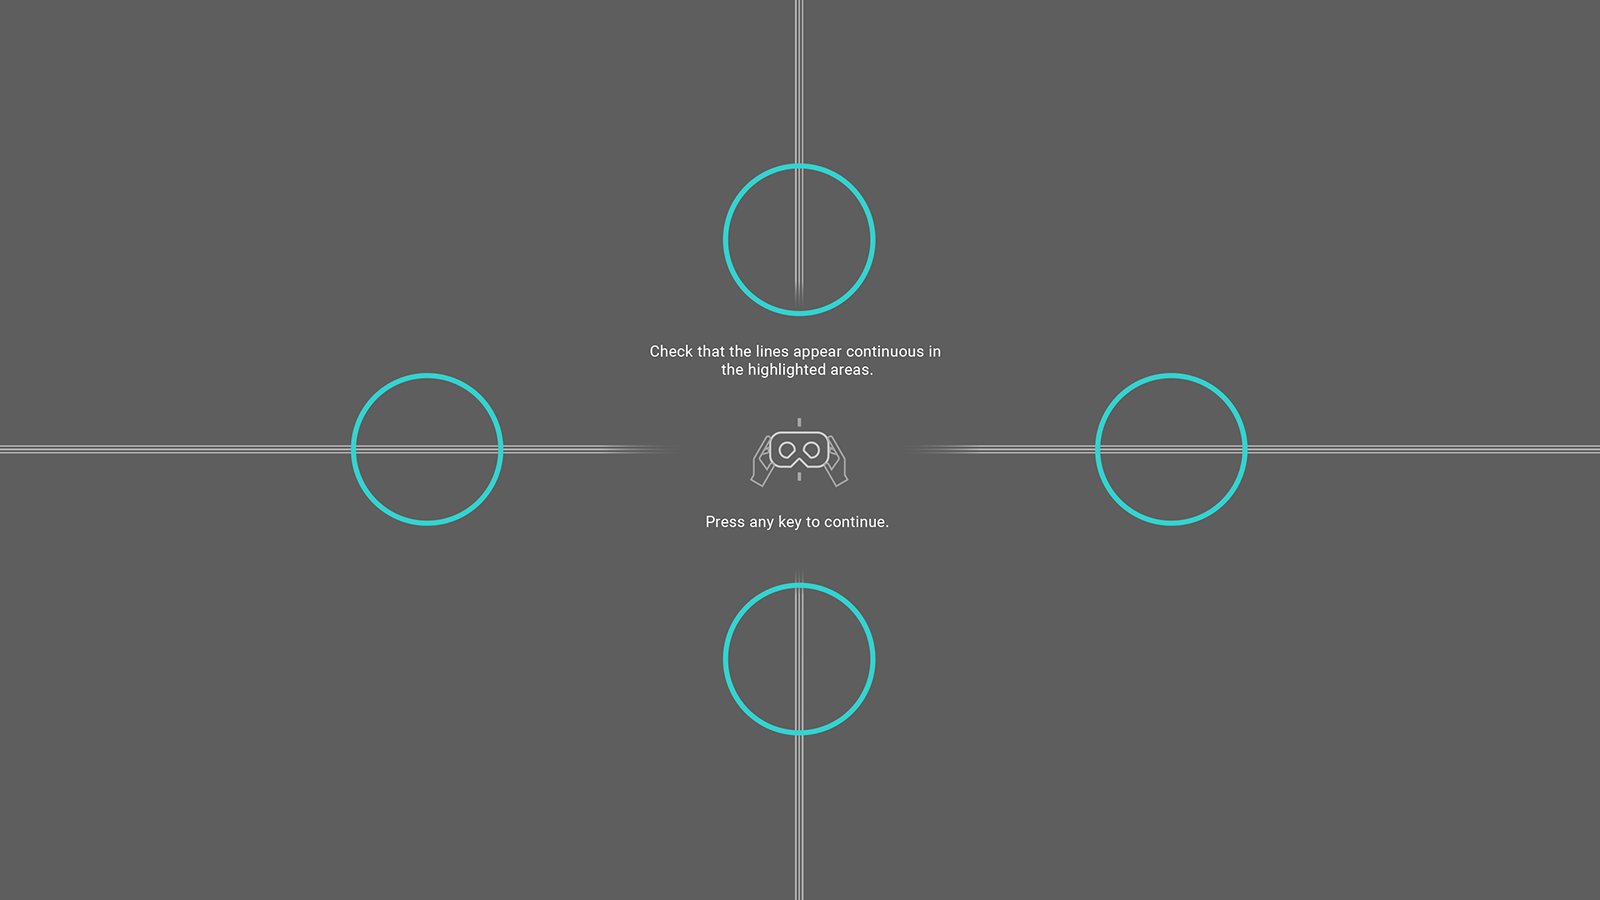
The headset positioning guide shows four lines extending from the center of the display towards the edges. Looking closely, you will see that each line consists of three thinner lines.
Carefully observe the thin lines in the four areas highlighted with blue circles. These are the intersections where the high-resolution focus area meets the lower-resolution peripheral area. When the headset is positioned correctly, the lines will appear continuous in all four areas. If the lines appear broken, blurred, or bent, try moving the headset to improve the image.

The image illustrates an example of good and bad positioning. Adjust the headset so that the lines appear continuous.
If the headset is not positioned well, straight lines in the virtual environment may also appear curved as they travel from the edges towards the center of the display. Additionally, you may notice blue or red halo colors on the edges of light-colored objects.
After you have found the optimal position for the headset, make sure to adjust the headband so that the headset feels stable and stays in place.
Image quality and performance
This section will help you find the right balance between image quality and application performance.

Resolution quality
Running highly detailed immersive applications in full resolution can be too demanding for some graphics cards. With the Resolution quality feature in Varjo Base, you can improve performance by adjusting the image resolution used by applications.
Navigate to the Headset tab and Resolution quality to select a resolution level. You can choose one of six values, from Highest to Very Low. The default value is High. Higher values correspond to a higher resolution and better visual quality, while lower values improve performance performance by using a lower resolution.
Note that Varjo System will restart after you change the setting. Varjo Base remains open throughout.
Image resolutions
The exact image resolution for each setting depends on your headset model and rendering mode.
1. XR-4 running a Varjo native application with foveated rendering (eye tracking calibrated):
| Setting | Resolution (pixels per eye) | PPD (pixels per degree) |
| Highest | 2840 x 2816 (peripheral area), 1680 x 1680 (focus area) | 55 (Supersampled) |
| Very high | 2440 x 2424 (peripheral area), 1568 x 1568 (focus area) | 51 |
| High (default) | 2100 x 2084 (peripheral area), 1472 x 1472 (focus area) | 48 |
| Medium | 1804 x 1792 (peripheral area), 1376 x 1376 (focus area) | 45 |
| Low | 1552 x 1540 (peripheral area), 1296 x 1296 (focus area) | 42 |
| Very low | 1336 x 1324 (peripheral area), 1216x 1216 (focus area) | 40 |
2. XR-4 running Varjo native or OpenXR applications in quad view mode (fixed foveation, for example, due to non-calibrated eye tracking):
| Setting | Resolution (pixels per eye) | PPD (pixels per degree) |
| Highest | 3020 x 2996 (peripheral area), 3344 x 3344 (focus area) | 51 |
| Very high | 2596 x 2576 (peripheral area), 2896 x 2896 (focus area) | 44 |
| High (default) | 2232 x 2216 (peripheral area), 2512 x 2512 (focus area) | 38 |
| Medium | 1920 x 1904 (peripheral area), 2176 x 2176 (focus area) | 33 |
| Low | 1652 x 1640 (peripheral area), 1888 x 1888 (focus area) | 29 |
| Very low | 1420 x 1408 (peripheral area), 1632 x 1632 (focus area) | 25 |
3. XR-4 running an OpenVR/OpenXR application in stereo rendering mode:
| Setting | Resolution (pixels per eye) | PPD (pixels per degree) |
| Highest | 5184 x 5134 | 35 |
| Very high | 4320 x 4278 | 30 |
| High (default) | 3600 x 3566 | 25 |
| Medium | 2988 x 2958 | 20 |
| Low | 2480x 2456 | 17 |
| Very low | 2058 x 2038 | 14 |
4. XR-3 and VR-3 running a Varjo native application with foveated rendering (eye tracking calibrated):
| Setting | Resolution (pixels per eye) | PPD (pixels per degree) |
| Highest | 2276 x 1948 (peripheral area) + 2156 x 2156 (focus area) | 70 |
| Very high | 1976 x 1696 (peripheral area) + 1984 x 1984 (focus area) | 65 |
| High (default) | 1720 x 1476 (peripheral area) + 1824 x 1824 (focus area) | 59 |
| Medium | 1496 x 1284 (peripheral area) + 1676 x 1676 (focus area) | 55 |
| Low | 1304 x 1116 (peripheral area) + 1544 x 1544 (focus area) | 50 |
| Very low | 1132 x 972 (peripheral area) + 1420 x 1420 (focus area) | 46 |
5. XR-3 and VR-3 running a Varjo native application in quad view mode (fixed foveation, for example, due to non-calibrated eye tracking):
| Setting | Resolution (pixels per eye) | PPD (pixels per degree) |
| Highest | 2816 x 2816 (peripheral area) + 1896 x 1896 (focus area) | 70 |
| Very high | 2452 x 2100 (peripheral area) + 1708 x 1708 (focus area) | 63 |
| High (default) | 2132 x 1828 (peripheral area) + 1536 x 1536 (focus area) | 57 |
| Medium | 1856 x 1592 (peripheral area) + 1384 x 1384 (focus area) | 51 |
| Low | 1616 x 1384 (peripheral area) + 1244 x 1244 (focus area) | 46 |
| Very low | 1404 x 1204 (peripheral area) + 1120 x 1120 (focus area) | 41 |
6. XR-3, VR-3, and Varjo Aero running an OpenVR/OpenXR application in stereo rendering mode:
| Setting | Resolution (pixels per eye) | PPD (pixels per degree) |
| Highest | 4148 x 3556 | 35 |
| Very high | 3608 x 3092 | 30 |
| High (default) | 3140 x 2692 | 27 |
| Medium | 2732 x 2340 | 23 |
| Low | 2376 x 2036 | 20 |
| Very low | 2068 x 1772 | 17 |
7. Varjo Aero running a Varjo native application with foveated rendering (eye tracking calibrated):
| Setting | Resolution (pixels per eye) | PPD (pixels per degree) |
| Highest | 2192 x 1880 (peripheral area) + 1200 x 1200 (focus area) | 39 |
| Very high | 1908 x 1632 (peripheral area) + 1140 x 1140 (focus area) | 37 |
| High (default) | 1660 x 1420 (peripheral area) + 1076 x 1076 (focus area) | 35 |
| Medium | 1444 x 1236 (peripheral area) + 1020 x 1020 (focus area) | 33 |
| Low | 1256 x 1076 (peripheral area) + 970 x 970 (focus area) | 32 |
| Very low | 1092 x 936 (peripheral area) + 922 x 922 (focus area) | 30 |
8. Varjo Aero running a Varjo native application in quad view mode:
| Setting | Resolution (pixels per eye) | PPD (pixels per degree) |
| Highest | 2608 x 2236 (peripheral area) + 2360 x 2360 (focus area) | 36 |
| Very high | 2268 x 1944 (peripheral area) + 2054 x 2054 (focus area) | 31 |
| High (default) | 1972 x 1692 (peripheral area) + 1788 x 1788 (focus area) | 27 |
| Medium | 1716 x 1472 (peripheral area) + 1556 x 1556 (focus area) | 24 |
| Low | 1492 x 1280 (peripheral area) + 1354 x 1354 (focus area) | 20 |
| Very low | 1300 x 1116 (peripheral area) + 1178 x 1178 (focus area) | 18 |
Refresh rate
Refresh rate determines how many times a second your headset displays a new image. A higher refresh rate requires more processing power but results in more frames per second.
XR-4
You can set the refresh rate of your XR-4 headset to either 75 Hz or 90 Hz in Varjo Base:
- Open Varjo Base.
- Go to the Headset tab -> Image quality.
- Use the dropdown menu under Refresh rate to set the refresh rate to either 75 Hz or 90 Hz.
Refresh rate options:
| 90 Hz refresh rate (maximum 90 fps) |
|
| 75 Hz refresh rate (maximum 75 fps) |
|
Simple rendering
XR-3 and VR-3
The Simple rendering feature provides another way to improve application performance by lowering image quality. When Simple rendering is in use, the focus area of the Bionic Display™ is disabled and the same image resolution is used for both the focus area and peripheral area of the display. The resulting performance improvement allows you to, for example, use multiple monitors simultaneously.
To enable the feature, navigate to the Headset tab in Varjo Base and select Simple rendering. Note that Varjo system will restart after you change the setting.
Vertical synchronization
Vertical synchronization synchronizes the framerates between headset displays and the application.
When running performance-intensive applications, the application framerate can fluctuate and cause graphical artefacts known as screen tearing. With the Vertical synchronization feature in Varjo Base, you can lower the framerate to improve performance and allow your application to run smoothly.
XR-4, XR-3, VR-3, and Varjo Aero
Vertical synchronization is disabled by default. Navigate to the Headset tab and Vertical synchronization to choose one of four options. Note that if you select Disabled, Motion smoothing is not available.
| Automatic | Varjo headsets operate at 90Hz, and if the application fails to submit frames at 90Hz, the virtual reality experience is not very smooth. If the framerate is not locked, the application can sometimes render the frames fast enough to hit the same number of screen refreshes as before, and sometimes not, which results in the same, old frame being displayed in irregular number of times. In such case the images may be stuttery.
When you select verticial synchronization to Automatic, the headset adjusts the framerate by lowering it automatically until your application is running smoothly. You may want to use automatic synchronization if you use several applications that support different framerates. This may, however, mean that the framerate fluctuates between different values, which may result in some discontinuity in the image. If you mostly use one application only, and know the application framerate, we recommend using either one of the fixed framerates together with Motion smoothing to ensure the best experience. |
| Enabled – Fixed 45 fps | Fixes the headset framerate to 45 fps. Use this is if you know the application framerate goes over 45 fps. |
| Enabled – Fixed 30 fps | Fixes the headset framerate to 30 fps. Use this if you know the application framerate goes over 30 fps. |
| Disabled | Headset displays show the frames provided by the application freely without synchronizing them with the headset displays. Motion smoothing is not available for this option. |
XR-1 Developer Edition, VR-2 Pro, VR-2, and VR-1
Navigate to the Headset tab and Vertical synchronization to select a synchronization mode.
The default option is Adaptive synchronization, which makes a compromise between improved application performance and a lower framerate. Full synchronization lowers the framerate further to make sure that your application runs smoothly. Select Off to disable the feature completely.
Mixed reality camera calibration
XR-4 Focal Edition
The autofocus cameras calibrate automatically, and the Automatic autofocus camera calibration is enabled by default in Varjo Base release versions from 4.7 onwards.
However, you can still recalibrate the autofocus cameras manually if, for example, the video pass-through cameras do not focus correctly onto an object or if there is a discrepancy in focus between left and right.
Follow these steps to recalibrate the autofocus cameras manually:
- Download the correct size calibration sheet from varjo.com/downloads and attach it to a wall. Make sure it is straight.
- Open Varjo Base.
- Navigate to Support > Automatic autofocus camera calibration.
- Disable the ‘Automatic autofocus camera calibration’.
- Next to ‘Manual autofocus camera calibration, select Open to start the calibration.

- Place the headset on a flat surface 50 cm (20 in) away from the calibration sheet.
- Aim the headset cameras so that the calibration sheet fills the target area. Make sure your room is well lit.
- Select Calibrate.
- Follow the instructions in Varjo Base.


Note: If you want to adjust focus so that the image is sharp at, for example, exactly 100 cm, adjust the focus manually instead. Navigate to Mixed reality settings in Varjo Base, turn the Auto focus to manual mode, and then use a slider to control the focusing distance in centimeters.
XR-1 Developer Edition
For guidance on how to calibrate the mixed reality cameras on the XR-1 Developer Edition, see Mixed reality camera calibration.
Motion smoothing
The Motion smoothing feature in Varjo Base improves image quality by predicting and smoothing movement in applications. Motion smoothing takes into account both the headset moving in relation to the scene (spatial reprojection) and objects in the scene moving in relation to the headset (temporal reprojection).
Vertical synchronization and Motion smoothing together cover all visual motion in virtual reality and therefore bring the best experience.
To use Motion smoothing, navigate to the Headset tab and Motion smoothing.
| Always enabled | When enabled, Motion smoothing is used for all applications regardless of whether they support1 it or not. When selected, the depth data of the application is taken into account to improve the experience.
If the application doesn’t provide motion vector data, the motion vectors are generated by predicting the movement of the objects based on pixel movements. |
| Enabled if app supports it | Motion smoothing is applied if the application supports it1. In addition to depth data, also the motion vector data is taken into account to improve the experience. |
| Disabled | The default option that disables Motion smoothing completely. If Vertical synchronization is disabled, Motion smoothing is disabled automatically. |
1An application can support motion smoothing by providing motion vectors for moving objects in the scene. Varjo System uses the motion vector data for improving the motion prediction.
Note that enabling Motion smoothing for applications that do not support it may in some cases cause unexpected visual artifacts.
We recommend that you try out the different options to find the one that works best for your application. Using Motion smoothing may introduce a small loss in performance.
Display blending
XR-1 Developer Edition, VR-2 Pro, VR-2, and VR-1
The focus area at the center of the Bionic Display™ features human-eye resolution, while the surrounding peripheral area is rendered in lower resolution. In Varjo Base you can choose how the two areas blend together.
In the Headset tab, open Display blending. Select Smooth: Seamless transition to seamlessly blend the focus and peripheral areas together by decreasing the image resolution towards the outside edges of the focus area. Sharp: Maximum resolution and contrast maximizes the area with the highest resolution. Note that selecting this option will make the border between the two areas more noticeable.