Mixed reality camera calibration
This guide is for the XR-1 Developer Edition. For guidance on how to calibrate the mixed reality cameras on the XR-4 Focal Edition, see Autofocus recalibration.
XR-1 Developer Edition
Every Varjo headset is precisely calibrated during manufacturing. As high-precision optical instruments, the mixed reality cameras on your headset can be affected by improper handling.
In some rare cases, such as if the headset is dropped, you may need to recalibrate the cameras on your headset. We strongly recommend that you recalibrate the cameras only if your current calibration settings are clearly flawed.
Testing the mixed reality camera calibration
XR-1 Developer Edition features video pass-through and infrared cameras. We provide example programs to help you verify that the cameras on your headset are calibrated correctly.
Follow the instructions below to test the camera calibration of your headset.
Setting up the example programs
- Download and install Varjo Base. You will need to log in with your Varjo Account or create a new account to download Varjo Base.
- Download Varjo SDK for Custom Engines.
- Build both the MarkerExample and MRExample programs included in the examples folder in Varjo SDK. Follow the build instructions in varjo-sdkexamplesREADME.txt, using the Release configuration in CMake:
- When using CMake on the command line:
> cmake --build . --config Release - When using the Visual Studio IDE: Choose the Release configuration in the Configuration Manager.
- When using CMake on the command line:
Testing video pass-through camera calibration
- Print an object marker in medium size. Follow the printing instructions carefully and make sure that the marker is sized correctly.
- Start Varjo Base and run MarkerExample.
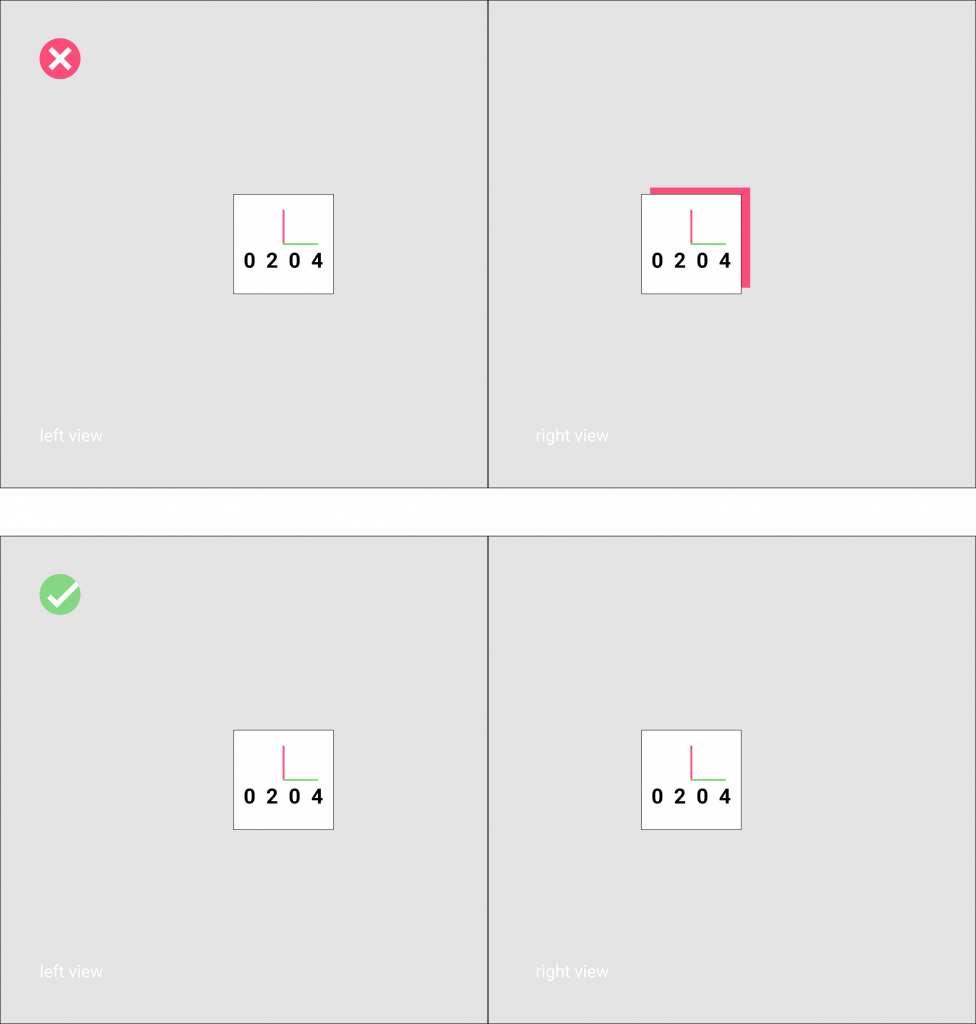
- Pointing your headset at the marker, observe if the rendered marker lines up with the physical marker. You can do this either in the Analytics window in Varjo Base or while wearing the headset. For easier inspection, open a magnified view in the Analytics window and select the Left, Right, and Focus options in the toolbar.
The image shows examples of marker alignment in the headset view. In the top row, the right view shows the rendered marker offset from the physical marker. In the second row the markers are correctly aligned.
If your headset displays misaligned markers, you may need to recalibrate the cameras. Please follow the instructions to recalibrate.
Testing infrared camera calibration
- Start Varjo Base and run MRExample.
- Press F7 in the console window to turn on depth estimation.
- Several cubes are visible in the headset view. Moving your hand in front of the cubes, observe if your hand occludes the cubes correctly. We recommend that you wear the headset while doing this, although you can also use the Analytics window in Varjo Base.
The image shows examples of hand occlusion in the headset view. On the left the hand mask effect is offset from its correct location, which may cause the background to become visible through the cube. On the right, the hand mask matches the location of the real hand.
If the hand mask does not line up with your hand, you may need to recalibrate the cameras on your headset. Please follow the instructions to recalibrate.
Recalibrating the mixed reality cameras
The cameras on your headset can be recalibrated using a camera calibration marker available from Varjo. You can request a calibration marker through Varjo Support.
To start calibration in Varjo Base, navigate to the Support tab and select Recalibrate mixed reality cameras. Holding the headset in your hands, place the camera calibration marker in view of the front-facing cameras and follow the instructions in Varjo Base. Make sure to have good lighting in the room when calibrating.
You can verify the results of recalibration by testing the calibration of the mixed reality cameras again.
To reset your calibration settings, select Reset to factory calibration settings in Varjo Base. This option is available after you have recalibrated the cameras.

