Fitting the headset
This page includes tips to help you find a comfortable fit while wearing your Varjo XR-1 Developer Edition, VR-2 Pro, VR-2, or VR-1 headset.
Adjusting the headband
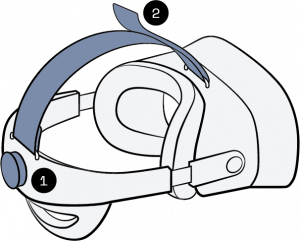
Varjo headsets come with an adjustable headband. There are two ways to adjust the headband’s fit: (1) using the adjustment wheel on the back of the headband and (2) using the head strap on top.
Before wearing the headset, loosen the headband by rotating the wheel counterclockwise and open the head strap. Do not force the headset on without loosening the headband first.
Put the headset on and rotate the adjustment wheel clockwise until the headset fits, then tighten the head strap. You will find the best fit for yourself by trying different ways to tighten the headband. Be careful not to over-tighten.
You can wear eyeglasses or contact lenses with your Varjo headset.
Fitting the mask

The headset comes with two masks — one attached and one packaged separately in the box. Which mask is attached by default depends on the headset model.
| Headset model | VR-1 | VR-2 | VR-2 Pro | XR-1 Developer Edition |
| Attached | Standard (fabric) | Large (fabric) | Large (polyurethane) | Large (polyurethane) |
| In box | Large (fabric) | Standard (fabric) | Standard (fabric) | Standard (fabric) |
The large mask is wider and taller. It accommodates different head shapes and provides more space between eyeglasses and the headset lenses. If the standard mask feels too tight for you, switch to the larger mask.
View the instructions for changing the mask.
Using the light blocker
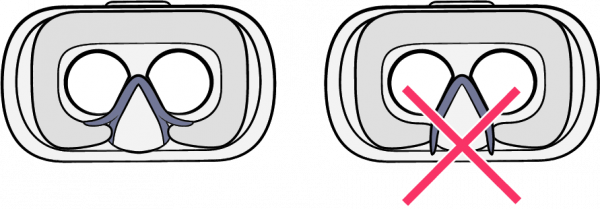
Varjo headsets use a light blocker to prevent daylight from affecting the virtual reality experience. Position the light blocker flaps on top of the face cushion as shown in the picture.
Remember to readjust the light blocker when changing the mask or changing the face cushion.
Changing the mask
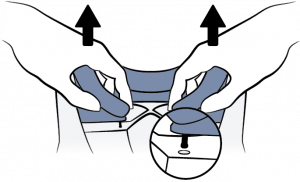
To provide the best fit and comfort, the headset comes with two masks (standard and large). The mask can be changed as follows:
- Place the headset on a flat surface with the front plate facing down. Be careful not to scratch the front plate.
- Loosen the adjustment wheel to make space between the headset and the headband.
- Pull out the two holders around the nose pad that attach the mask to the headset, while firmly holding the headset in place.
- To remove the mask, gently lift either edge of the mask until it releases.
- Place the new mask on the headset. The magnets will snap it into position.
- Push the two holders around the nose pad in place.
Changing the face cushion
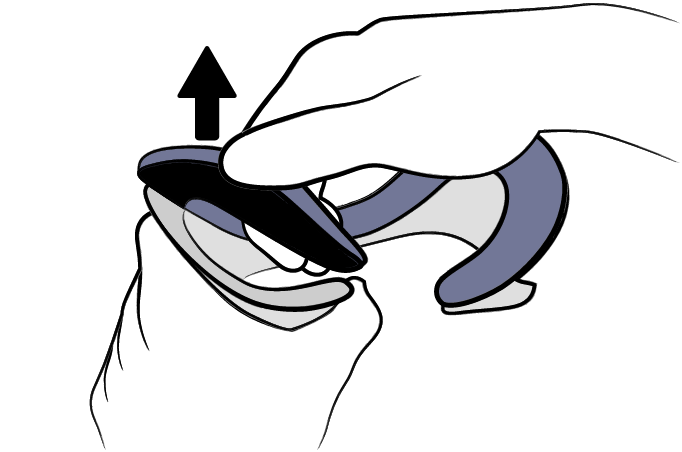
The face cushion is attached to the mask with hook-and-loop strips and can be easily changed.
1. Remove the mask as described in Changing the mask.
2. Gently pull the cushion from either of the corners and lift it off.
3. Attach a new cushion by starting from either of the corners and push it firmly into place.
4. Ensure that there are no wrinkles in the cushion and that it covers the whole mask.
5. Place the mask on the headset.
You can purchase additional cushions in Varjo Store.
Removing the counterweight
XR-1 Developer Edition and VR-2 Pro
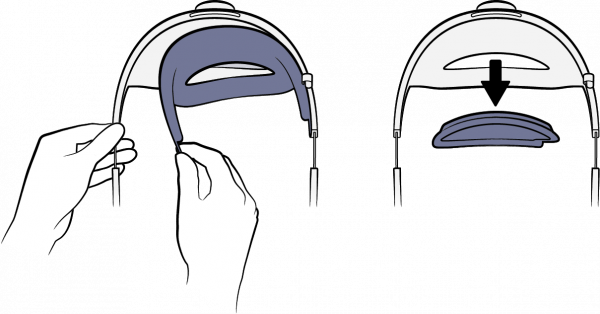
XR-1 Developer Edition and VR-2 Pro are fitted with a removable counterweight under the back cushion of the headband. The counterweight helps to distribute the weight around your head; however, you may wish to remove it to lighten the headset.
To remove the counterweight:
- Place the headset on a flat, level surface. Note that the counterweight is not secured in the headband and will dislodge if tilted.
- Loosen the head strap to better access the back cushion of the headband.
- Remove the back cushion by gently pulling it away from the headband.
- Carefully remove the counterweight.
- Reattach the back cushion and adjust the head strap.