Connecting VR-2 Pro, VR-2, and VR-1
Get started by installing Varjo Base and connecting your headset.
You will need a commercial Varjo Account to download Varjo Base. Create an account now.
Start Varjo Base and follow the setup steps
Varjo Base will help you set up your headset. You can also follow along the setup steps on this page.
When you start Varjo Base for the first time, we will run a system check to confirm that your computer is compatible with the headset. See System requirements for more information.
Connect your headset
You can follow along with the video below or go through the list of setup steps to connect your headset.
|
|
1. Start Varjo Base
Varjo Base is the software needed to run your headset on a Windows computer. Download Varjo Base to get started. You will need a commercial Varjo Account to download Varjo Base. If you don’t have an account yet, you can create an account now.
|
|
|
2. Log in with your Varjo Account
In Varjo Base, log in with your Varjo Account to start setup. Note that while you can skip the login at this point and proceed with setup, you will need to log in to update Varjo Base.
|
|
|
3. Select your headset model
When you start Varjo Base for the first time, it will automatically open the first-time user guide to help you through the setup process. You can open the guide at any time in the Support tab under Run setup. Select your headset model to view detailed instructions on how to connect your headset.
|
|
A. See the cabling options in more detail.
|
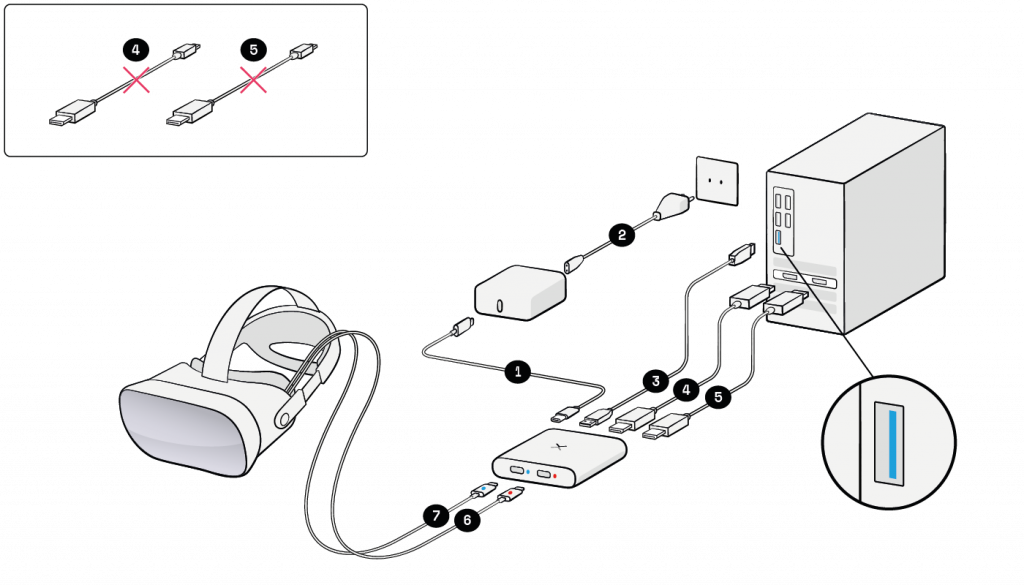
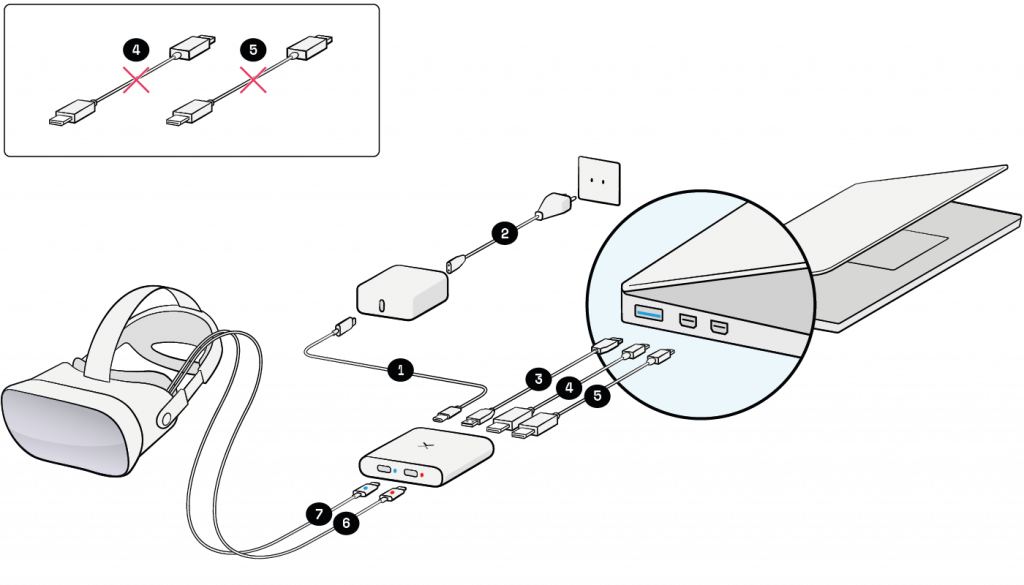
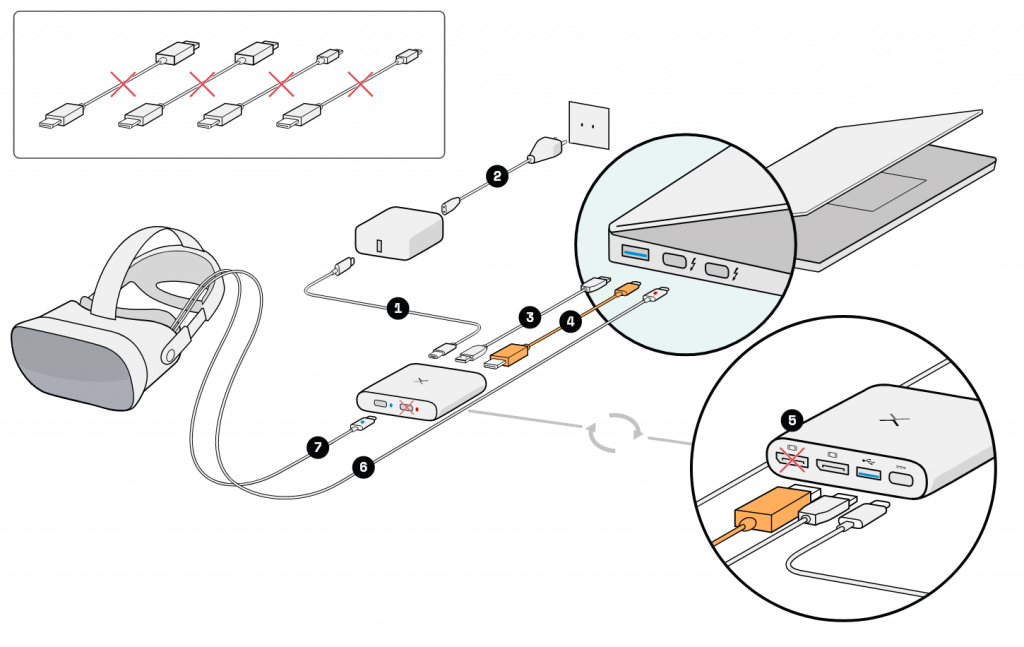
4. Connect your headset
When you connect the headset to your computer for the first time, Windows will recognize the headset as a new USB device and install the appropriate drivers. A. Desktop computers with two full-size DisplayPort ports DisplayPort cables (4 and 5): Use the full-size DisplayPort cables provided in the box. If your computer has both an integrated and a dedicated graphics card, make sure to use the ports on your dedicated graphics card. B. Laptops with two Mini DisplayPort ports DisplayPort cables (4 and 5): Depending on your laptop, you can use either the DisplayPort or Mini DisplayPort cables provided in the box (VR-2 Pro and VR-2). C. Laptops with one Mini DisplayPort and one Thunderbolt™ 3 port DisplayPort cable (4): Depending on your laptop, you can use either a DisplayPort or Mini DisplayPort cable provided in the box (VR-2 Pro and VR-2). The other DisplayPort cable (5) is not needed. Red optical cable (6): Connect directly to your laptop. Make sure to use a Thunderbolt™ 3 port with a lightning symbol. D. Laptops with two Thunderbolt™ 3 ports DisplayPort cable (4): You can use an additional DisplayPort to Thunderbolt™ 3 cable. This cable is not included in the box. Use a cable, not an adapter, and make sure connect to a Thunderbolt™ 3 port with a lightning symbol on your laptop. The other DisplayPort cable (5) is not needed. Red optical cable (6): Connect directly to your laptop. Make sure to use a Thunderbolt™ 3 port with a lightning symbol.
|
|
|
5. Install the headset configuration bundle (VR-2 Pro and VR-2 only)
To experience the best possible image quality, download and install the headset configuration bundle for your headset. If you haven’t yet installed the configuration bundle, a notification will appear in the status area in Varjo Base with instructions for downloading it. Alternatively, you can navigate to the Support tab in Varjo Base and follow the instructions under Software updates. For offline installation, download the headset configuration bundle on another computer and copy the installation files locally to your computer.
|
|
|
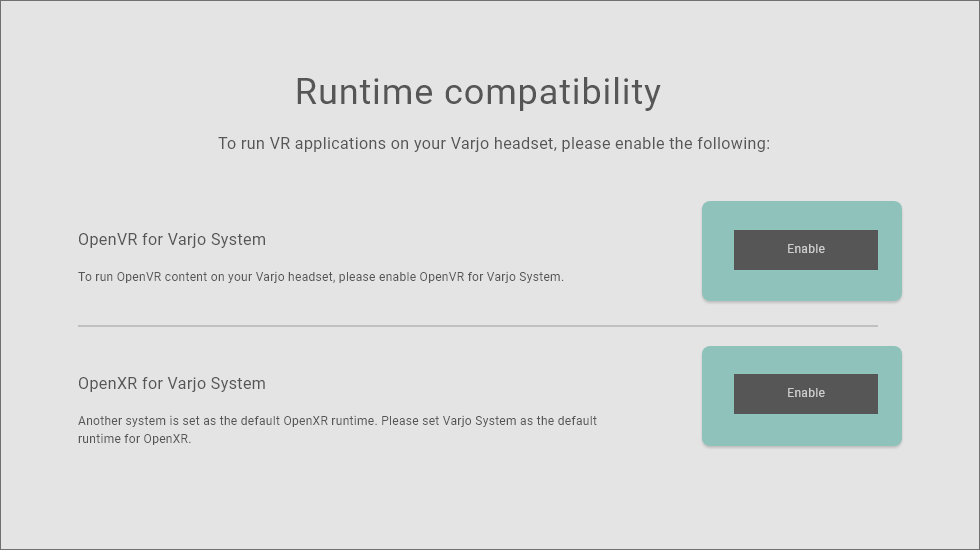
6. Enable OpenVR and OpenXR runtime
Varjo Base will attempt to automatically enable the OpenXR and OpenVR runtimes for Varjo headsets. If you have previously used an OpenXR- or OpenVR-compatible headset on this computer, you may be prompted to enable the runtimes manually. Enable the runtimes if you want to run OpenXR and OpenVR applications, such as SteamVR apps.
|
|
|
7. Optional: Connect your headphones
For applications that include sounds or voice input, you can plug your headphones into the headset. Headphones with a standard 3.5mm audio jack are compatible with Varjo headsets. Read more about compatible headphones. If necessary, see instructions on how to select the correct audio output and input source on your Windows computer.
|
|
|
8. Optional: Enable hand tracking (VR-2 Pro only)
The VR-2 Pro features integrated Ultraleap’s hand tracking, which requires additional software. To use hand tracking in your apps, download Ultraleap SDK for Varjo VR-2 Pro. Refer to our Developer portal for information on how to install and use hand tracking.
|


Set up tracking
Continue setup by selecting a tracking method for your headset. The Varjo VR-2 Pro, VR-2, and VR-1 headsets support the following tracking systems:
- SteamVR™ Tracking uses up to four SteamVR™ base stations to track your headset and optional controllers.
- Third-party tracking methods can also be integrated with Varjo headsets.