Get to know Varjo Reality Cloud
This page includes instructions to help you when using Varjo Reality Cloud.
Introduction to using Varjo Reality Cloud
User roles in Varjo Reality Cloud
Managing files in Varjo Reality Cloud
Uploading files to Varjo Reality Cloud
Creating a collaborative VRED session
Starting a session in Varjo Reality Cloud
Using inputs in Varjo Reality Cloud sessions
Introduction to using Varjo Reality Cloud
Varjo Reality Cloud allows streaming virtual and mixed reality contents to your Varjo devices, 2D computer screens, iOS devices, Valve Index, and Meta Quest headsets.
Streaming in Varjo Base always requires a Varjo headset, and the streaming is done using Varjo Reality Cloud inside Varjo Base.
When streaming to a 2D computer screen or Valve Index headsets, the standalone application of Varjo Reality Cloud is used instead. If the standalone application detects that Valve Index headset is connected the stream is started automatically in the headset. If a headset is not connected the streaming will start in the 2D software window.
When streaming to an iPhone or iPad, the Reality Cloud standalone application for iOS is used.
When streaming to Meta Quest headsets, the Reality Cloud standalone application for Meta Quest is used.
Currently supported applications include:
- Autodesk VRED
- Applications created with Unity
- Applications created with Unreal Engine
Using these applications in Reality Cloud means you can stream content created with them, whereas using the actual application editor is not supported.
For more information about developing applications that are supported by Reality Cloud, see Varjo Developer Portal.
Varjo Reality Cloud Main view
In Varjo Reality Cloud Main view you can
- view all files and invitations to collaborative sessions shared with you
- start a session from a file
- join collaborative Autodesk VRED session
- view file details
- delete files you have uploaded to Varjo Reality Cloud
- view headset connection status when using Valve Index headsets in the standalone application
When you use Reality Cloud with Varjo Base, you can also
- create collaborative Autodesk VRED sessions
- upload files to Reality Cloud
- share files with others

User roles in Varjo Reality Cloud
All Reality Cloud users need to be members of an organization. Users can belong to several organizations. User roles are managed in Varjo Account Portal.
| User roles | Admin user | User | Guest user |
| Create an organization | x1 | ||
| Invite new users and assign user roles | x | ||
| Purchase subscriptions to the organization | x | ||
| Upload files to Reality Cloud | x | x | |
| Start a session out of an uploaded file | x | x | x |
| Create collaborative VRED sessions from local files | x | x | |
| Create collaborative VRED sessions from uploaded files | x2 | x2 | |
| Join collaborative VRED sessions | x | x | x |
| Share uploaded files | x2 | x2 | |
| Delete files | x | x2 |
1 When a user creates a new organization they will become an admin for that organization.
2 If the user is the uploader.
Managing files in Varjo Reality Cloud
Reality Cloud in Varjo Base
You can upload and store files in Reality Cloud. This enables sharing files with others and starting sessions faster.
When you share a file with someone, they can start a session out of the file. The maximum number of simultaneous user sessions is defined by the number of seats in the Reality Cloud subscription.
As a file uploader, you have the following options for sharing files. You can share files with
- an individual member of your organization
- the entire organization excluding guest users
- guest users who are members of your organization.
As a file uploader, you can:
- start streaming sessions
- delete files that you have uploaded to Reality Cloud
- decide with whom you share files
- create collaborative Autodesk VRED sessions out of an uploaded file.
Organization Admin users can see all the files that are shared within an organization. They can manage files on behalf of the original file uploader, for example, delete files that are no longer needed.
To check with whom a particular file is shared, in the Main view, select the three-dot menu in the file and select View details.

Uploading files to Varjo Reality Cloud
Reality Cloud in Varjo Base
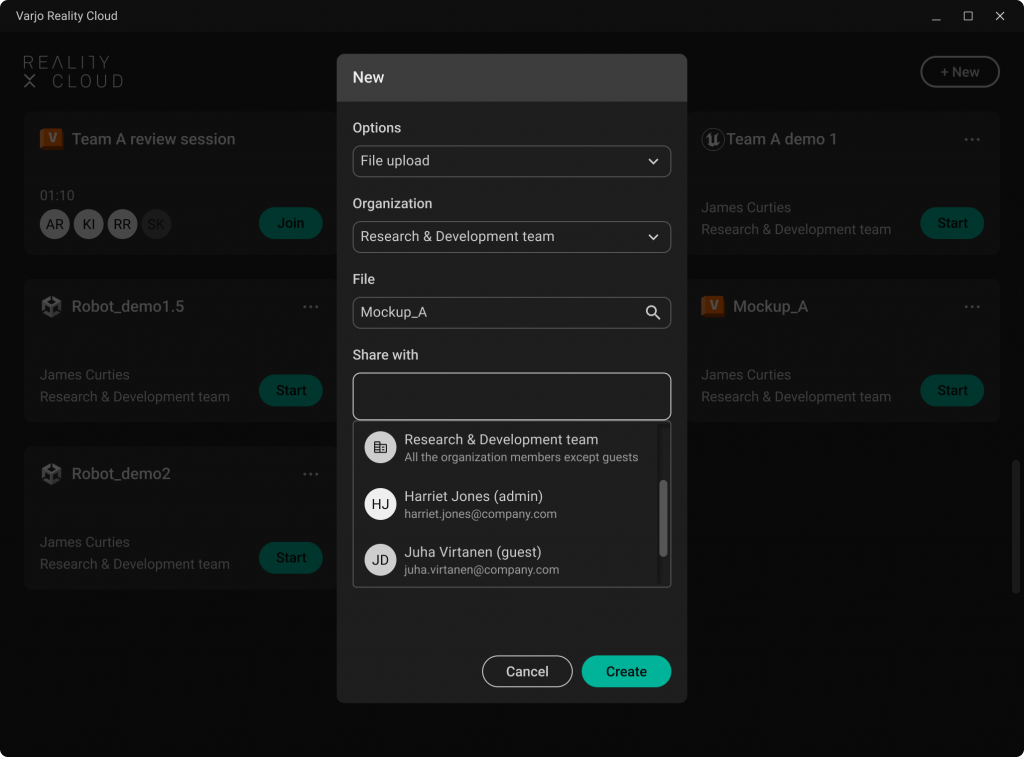
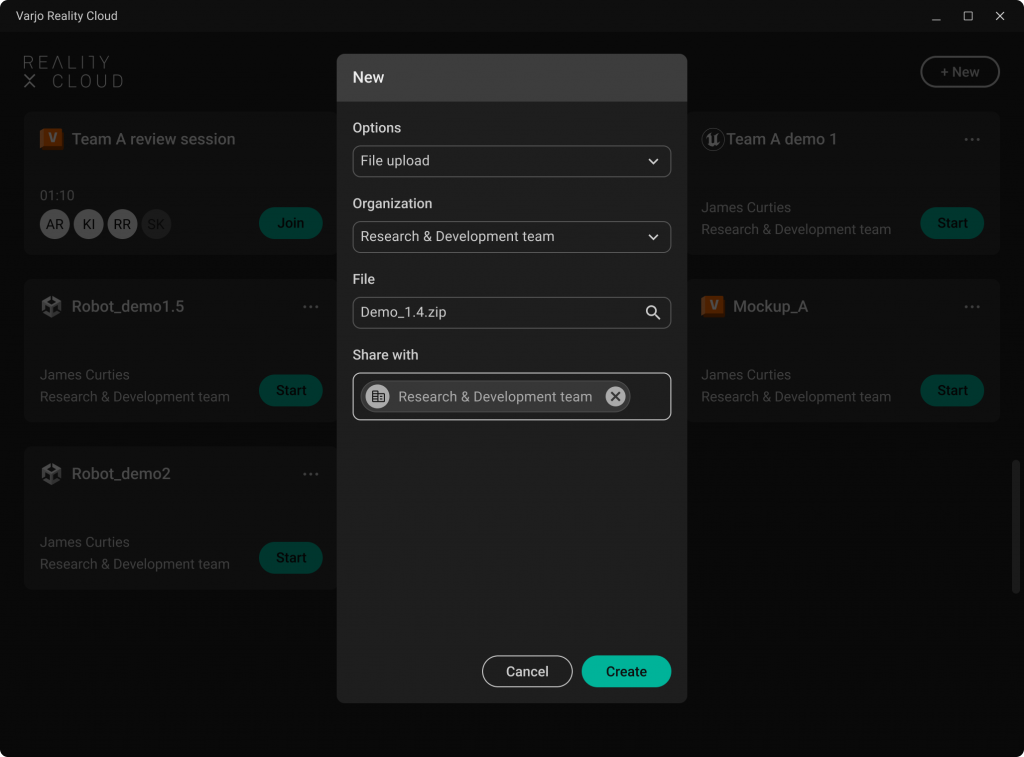
- In the Main view, select New.
- In Options, select File upload.
- Organization: If you are a member of more than one organization, select which organization’s account you want to use.
- In File, select the file you want to upload.
- In Share with, select with whom you want to share the file. If you don’t want to share the file with anyone, leave empty. You can later share the file with other users in the Main view.
- Select Create to start the upload. Depending on the file size and network connection, this may take a while. When the upload has finished, select Start on the file card to start streaming. You can also start the session later, or with Autodesk VRED files, you can create a collaboration session out of the uploaded file.
For Autodesk VRED, only .vpb files are supported. For Unity and Unreal Engine applications, use a compressed .zip file that contains all the needed files to run the application. For compressing, use Windows standard export functionality and do not remove anything from the output file. Varjo Reality Cloud also supports Unity and Unreal Engine networking-based (e.g. Photon-based) multiplayer.
You can also stream Unity and Unreal Engine content and start sessions without storing files in Reality Cloud. Select New and in Options, select Single-user session. Select the file and Create. After the session, all associated data is removed from Reality Cloud.
Creating a collaborative VRED session
Reality Cloud in Varjo Base
With Autodesk VRED, you can have collaboration sessions with the members of your organization.
There can be maximum of 5 participants in one session including the host. Note that you also need to have enough seats in your organization’s subscription.
When you create a collaboration session in Reality Cloud, you automatically become the host for that session. The host can create and end collaboration sessions, while participants can join and leave sessions started by the host.
As a host, you can choose a VRED scene for the session and define who can join the session.
You can create a collaboration session either
- from an existing file in the Main view: at the file, select the three-dot menu and Create collaboration session
- by creating the session without uploading and storing any files in Reality Cloud: in the Main view, select +New.
Fill in the Session name and select participants, and select Create. When the session is ready, select Start. Your session is now in progress and available for other participants to join.
When the host ends the session, all associated data is removed from Reality Cloud and a copy of the session file is saved in Downloads folder on the host’s Windows computer.

Starting a session in Varjo Reality Cloud
Reality Cloud in Varjo Base, Windows, iOS, Meta Quest 3, and Meta Quest Pro
The below functionalities work in all versions of Varjo Reality Cloud:
- Select the Start button on a project to start a session. If you are using Meta Quest, you can aim the controller at the Start button and press the trigger to start a session.
- Press the End session button at the top right corner of the screen to end the session. If you are using Meta Quest, press the B button on the right controller and select End session.
- You are automatically returned to the Main view when the session ends.
Using inputs in Varjo Reality Cloud sessions
Moving in the streamed content
Reality Cloud for Windows
When streaming content without a Varjo headset to your Windows computer you can move around in the content by using your keyboard and mouse:
- To walk forward and back, to strafe left and right: Use the W, S, A, and D keys, or the arrow keys.
- To move up and down in the content: Use the Spacebar and Ctrl keys, or Page Up and Page Down keys.
- To look up, down, left, and right: drag the mouse while pressing the right mouse button.
Reality Cloud for iOS
When streaming content to your iOS device you can move around in the content using the touch screen:
- To move: use the directional pad on the left side of the screen or drag your finger on the screen.
- Zoom in and out: drag two fingers on the screen.
- Reset your position: tap the Reset camera position
 button.
 button.
![]()
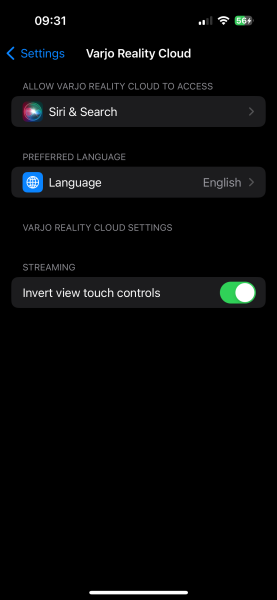
You can invert the touch gestures for panning the camera:
- Go to your device’s Settings -> Varjo Reality Cloud.
- Enable Invert view touch controls.
Reality Cloud for Meta Quest
When streaming content to a Meta Quest headset, you can move around in the content by walking or using the controllers:
- To move: walk, or point the controllers to the location you want to move to and press the trigger.
- To move the camera: turn your head, or use the controller’s joystick to turn the camera 45 degrees left or right.
Application-specific shortcuts
Reality Cloud in Varjo Base and Varjo Base for Windows
When using applications in Varjo Reality Cloud, you can use application-specific keyboard input when Varjo Base, Varjo Reality Cloud, or Varjo Base Analytics window is in focus during the session.
All participants in a collaborative session can use the keyboard input during the session.
For example, when using Autodesk VRED in Reality Cloud, you can use VRED application-specific keyboard input for working on a model. Note that we only support shortcuts that do not overlap with VRED Editor keyboard shortcuts.
In a Unity or Unreal Engine application session, you can use the keyboard input, for example, to trigger events or animations, or whatever the shortcut keys have been configured to do.
Read here for more details: